
Сумка-ананас
 Девочки, посмотрите, какую оригинальную сумку я нашла на англоязычном вязальном сайте! Такие вязали ещё в конце 19 века! Жалко, что у меня сейчас не много свободного времени, не могу заняться переводом... Для желающих даю ссылку: http://www.knitty.com/ISSUEss12/FEATss12SIT.php
|
|
Печать | Получить код для блога/форума/сайта |
Коды для вставки:
Как это будет выглядеть?
Скопируйте код и вставьте в окошко создания записи на LiveInternet, предварительно включив там режим "Источник"
HTML-код:

|
|
| BB-код для форумов: |
Как это будет выглядеть?
Страна Мам → Сумка-ананас
 |
Девочки, посмотрите, какую оригинальную сумку я нашла на англоязычном вязальном сайте! Такие вязали ещё в конце 19 века! Жалко, что у меня сейчас не много свободного времени, не могу заняться переводом... Для желающих даю ссылку: http://www.knitty.com/ Читать полностью |
| +95 |
 okmi
okmi
|
24 комментария |


Комментарии
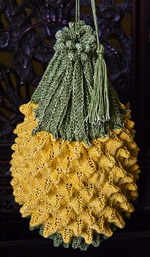
Approximately 12 inches high (excluding ribbon trim) by 11 inches wide
MATERIALS
Yarn
Lisa Souza Sylvie [100% Bombyx Silk; 750 yd per 6 oz skein]
spacer [MC] Artichoke; 1 skein
spacer [CC] Glory; 1 skein
Recommended needle size
[always use a needle size that gives you the gauge listed below -- every knitter’s gauge is unique]
spacer 1 24-inch US# 1/2.25mm circular needle
Notions
spacer 1 stitch marker
spacer scissors
spacer yarn needle
spacer sewing needle
spacer 1 yard green silk satin ribbon
spacer green sewing thread
spacer 670 gold-colored metal beads (optional, not pictured; see Pattern Notes)
GAUGE
32 sts/48 round = 4 inches in stockinette stitch
spacer
PATTERN NOTES
The bag is knit in one piece, in the round, from the top opening to the bottom. When changing from green (leaves) to yellow (fruit), the work is turned inside-out.
Historic gauge. Mrs. Gaugain’s primary version of the bag was knit with "purse silk" (akin in weight to a thick sewing thread or silk embroidery floss) on three double-pointed needles equivalent to a modern US 00000/1mm. If you’d like to try this option, CO 96 sts on the first and second needles, and 128 on the third. And good luck to ya!
Historic colors. The original pattern calls for four shades of green, from light to dark; and four shades of yellow, from pale to "a rich brown."
If you wish to imitate the historic colors, do so as follows:
For the leaves, CO and work the first 7 rnds with lightest green. Thereafter, change to a successively darker shade of green every 7 rnds.
For the fruit, begin with the lightest yellow, and change to a successively darker shade every 36 rnds. When all four shades of yellow have been used, switch back to green. Work four more repeats of Rnds 2–18, using each shade of green from darkest to lightest in successive repeats. Continue to use the lightest shade of green for the remainder of the bag.
Beading option. The original pattern offers the option of adding beads ("gilt"–gold-plated or gold-colored metal) to the cast-on row and to the tip of the knobs in the yellow section of the fruit. Beaded stitches are noted in the pattern.
LEAVES
With MC, CO 320 sts. If you are beading, place a bead on every CO st.
Join to work in the round, being careful not to twist. Place marker to indicate start of round.
K 1 rnd.
Begin leaf pattern:
Rnd 1: (K6, yo, k1, yo, k6, sl1-k2tog-psso) around.
Rnd 2: K7, yo, k1, yo, k6, sl1-k2tog-psso, (k6, yo, k1, yo, k6, sl1-k2tog-psso) to last 9 sts, work the (k6, yo, k1, yo, k6, sl1-k2tog-psso) once more, removing the start of round marker to work the k2tog. Replace the start of round marker after the decrease.
Repeat Rnd 2 26 more times.
Break yarn, leaving 6–8 inch tail.
FRUIT
Join CC.
Setup round: Knit around.
Turn the work inside out.
Note that your rounds will now reverse direction, and this will leave a small hole at point where Rnd 2 begins. Don’t fret -- you can neaten it up during finishing.
Rnd 1: (K6, sl1-k2tog-psso, k6, yo, k1,yo) around.
Rnd 2: (K5, sl1-k2tog-psso, k6, yo, k1, yo, k1) around.
Rnd 3: (K4, sl1-k2tog-psso, k6, yo, k1, yo, k2) around.
Rnd 4: (K3, sl1-k2tog-psso, k6, yo, k1, yo, k3) around.
Rnd 5: (K2, sl1-k2tog-psso, k6, yo, k1, yo, k4) around.
Rnd 6: (K1, sl1-k2tog-psso, k6, yo, k1, yo, k5) around.
Rnds 7-9: Knit: (If beading, place beads in Rnd 8 on the tip of each knob–every eighth st, immediately below the k1 between the yo’s.)
Rnd 10: (K1, yo, k1, yo, k6, sl1-k2tog-psso, k5) around.
Rnd 11: (K2, yo, k1, yo, k6, sl1-k2tog-psso, k4) around.
Rnd 12: (K3, yo, k1, yo, k6, sl1-k2tog-psso, k3) around.
Rnd 13: (K4, yo, k1, yo, k6, sl1-k2tog-psso, k2) around.
Rnd 14: (K5, yo, k1, yo, k6, sl1-k2tog-psso, k1) around.
Rnd 15: (K6, yo, k1, yo, k6, sl1-k2tog-psso) around.
Rnds 16-18: Knit: (If beading, place beads in Rnd 17 on the tip of each knob–every eighth st, immediately below the k1 between the yo’s.)
Repeat Rnds 1–18 6 more times, and Rnds 1–17 once more.
Cut yarn, leaving 6-8 inch tail.
Join MC. If you were beading, stop at this point.
K1 rnd. Work Rnds 1-18 four times.
Bottom
Rnd 1: (K5, sl1-k2tog-psso) around. 240 sts.
Rnds 2, 4, 6, 8, 10: Knit.
Rnd 3: K4, sl1-k2tog-psso, (k3, sl1-k2tog-psso) to last 6 sts, k3, then move marker 1 st to left, sl1, k2tog, psso. 160 sts.
Rnd 5: K2, sl1-k2tog-psso, (k1, sl1-k2tog-psso) to last 3 sts, k1, then move marker 1 st to left, sl1, k2tog, psso. 96 sts.
Rnd 7: (Sl1-k2tog-psso) around. 32 sts.
Rnd 9: K1, (sl1-k2tog-psso) to last st, k1. 14 sts.
Rnd 11: K1, (sl1-k2tog-psso) to last st, k1. 6 sts.
Cut yarn, leaving 6-8 inch tail. Run tail through remaining sts and pull to close bottom of bag.
Weave in ends on WS.
Mrs. Gaugain requires that the bottom of the bag be trimmed with “a bunch of green satin ribbon, rounded at the points like leaves.” I rounded both ends of eight short lengths of ribbon, then sewed them with silk thread to the point at which the bag stitches were drawn together.
She also specifies that the finished bag is “drawn in at the termination of the top leaves.” That’s all she says, however–leaving it up to the knitter to decide what to use for a drawstring.
I decided to use a braid, as follows:
Cut three 1-yard lengths of MC and braid them together, knotting both ends about 3 inches in. Draw the cord through the row of eyelets nearest the leaf tips. When the cord is pulled tight, this causes the leaves to bunch together in the most charming fashion. Add a tassel to the tied end if you feel like a bag shaped like a freaking pineapple just isn’t fancy enough.
Instead of braid you could use a length of silk cord or ribbon. If you’re concerned with period accuracy, do not use I-cord.
There are no indications in the original pattern that the bag is to be lined; but if you plan to carry very small or weighty items in your pineapple, and simple silk or cotton lining sewn into the fruit is a very good idea.
Но в этой конкретной сумочке , связанной кажется мужчиной
Вставка изображения
Можете загрузить в текст картинку со своего компьютера: