
Очень аккуратные петли. Помогите с переводом.
Девочки! Очень прошу помочь с переводом.
Очень понравились петли, но не получается их осилить.
Начиная с этого момента начинаются проблемы.
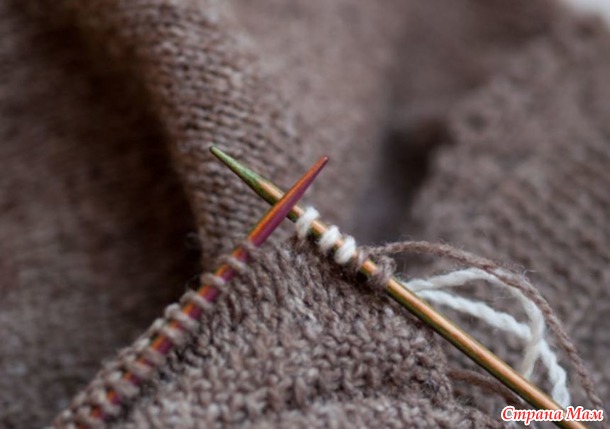
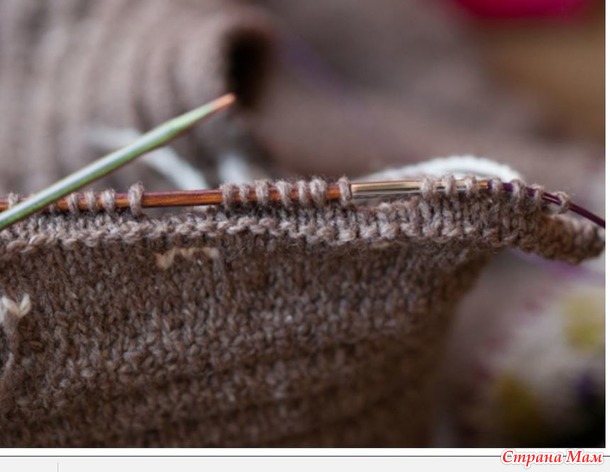
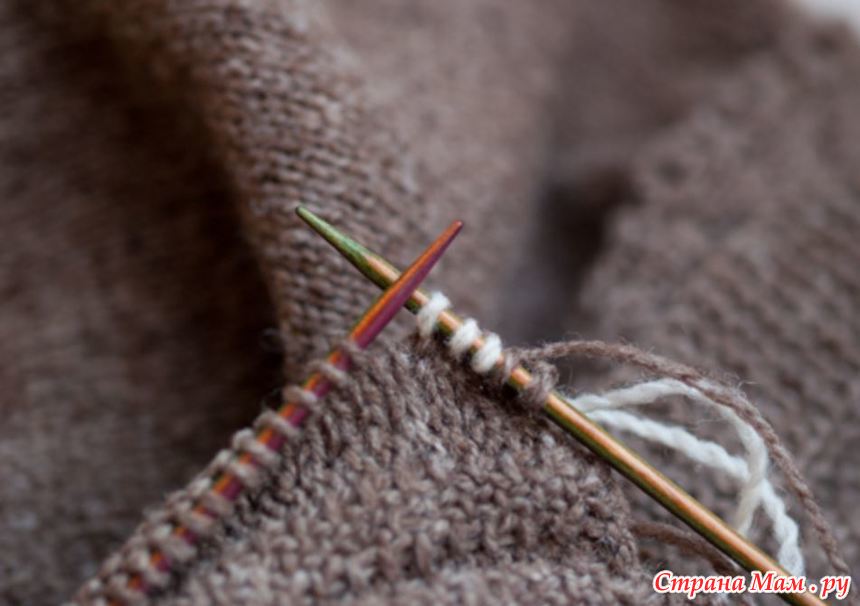
Those waste yarn stitches get slipped back to the left needle. Here they go:
Now you knit them again with the main yarn:
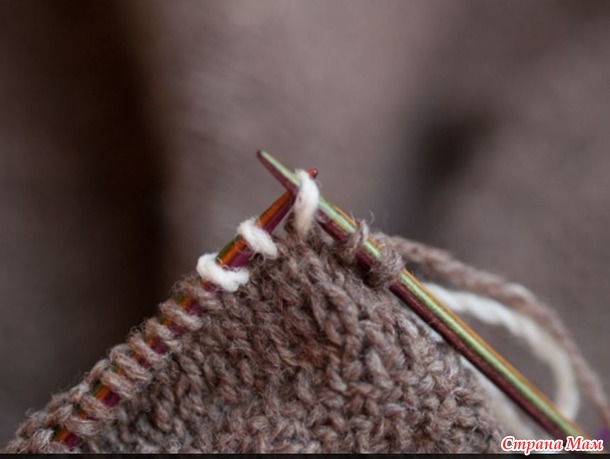
… and continue on to the next buttonhole, and then the next.
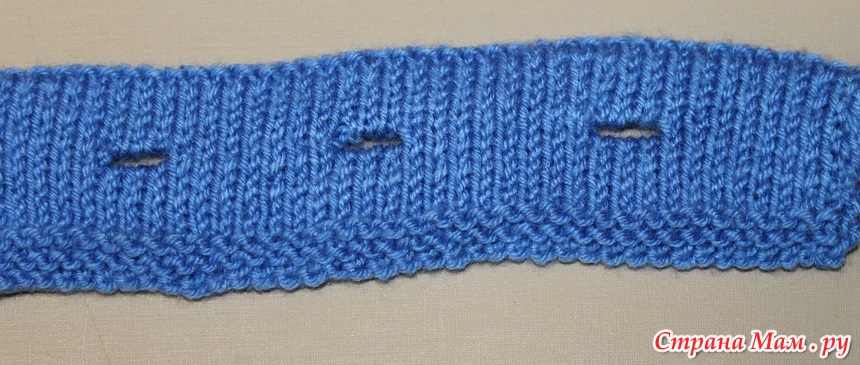
That’s all the fancy business for this row. Now you work three more stockinet rows, a turning row in reverse stockinet that will become the edge of the band, and three more rows of stockinet. Your work looks like this on the right side:
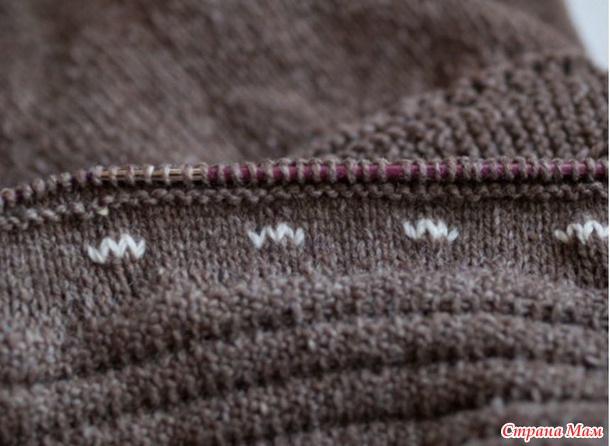
… and like this on the wrong side:

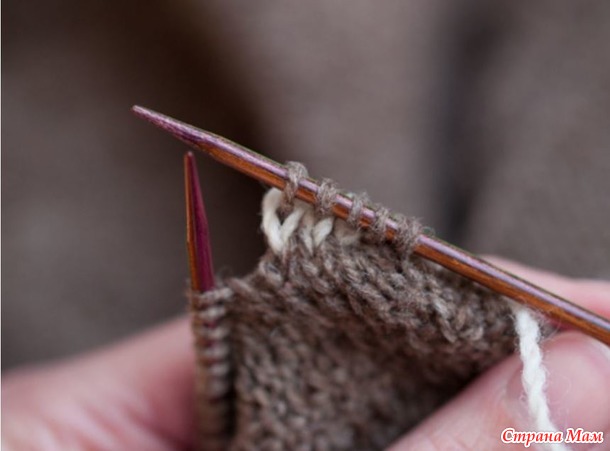
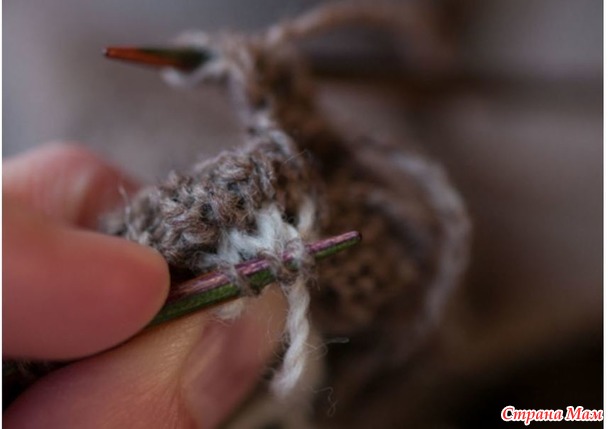
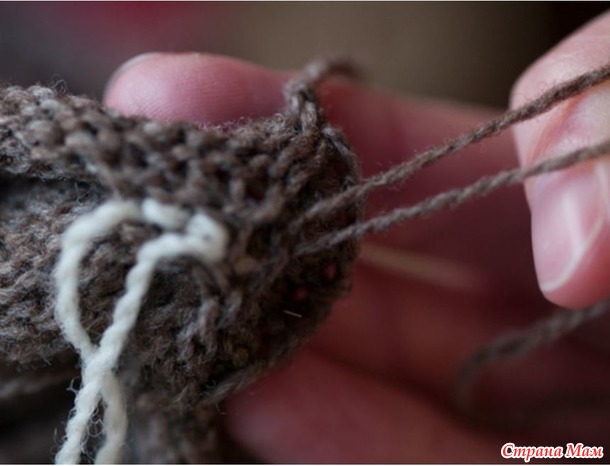
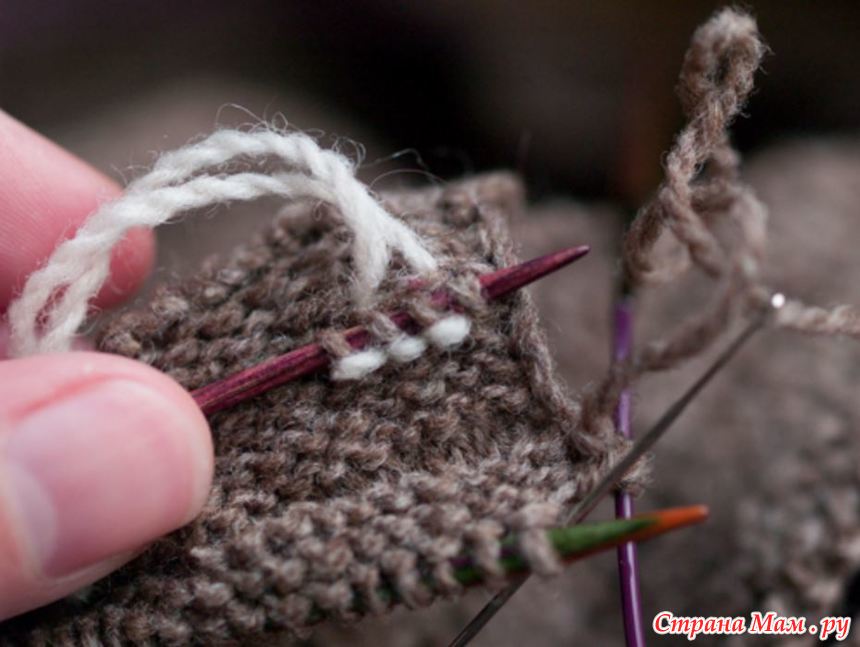
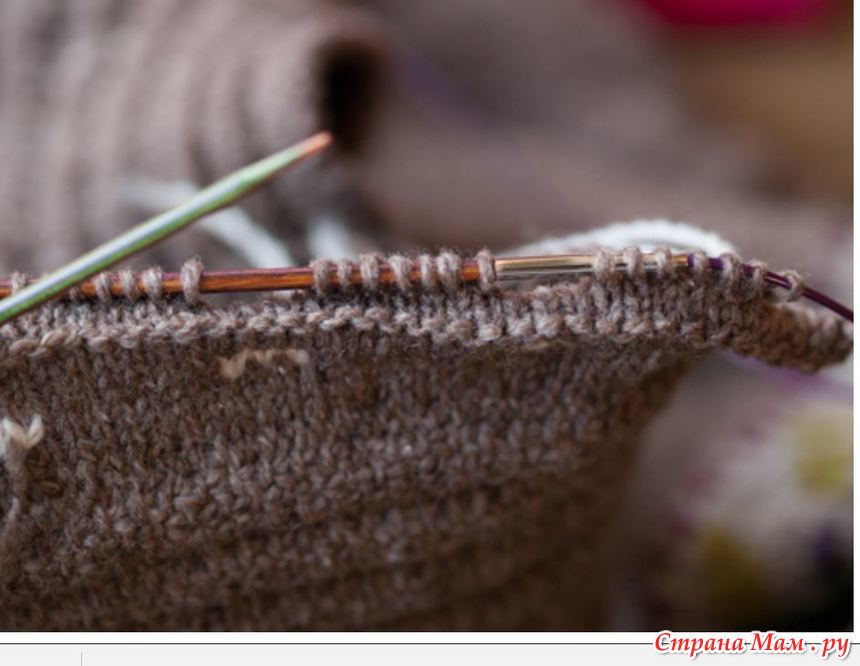
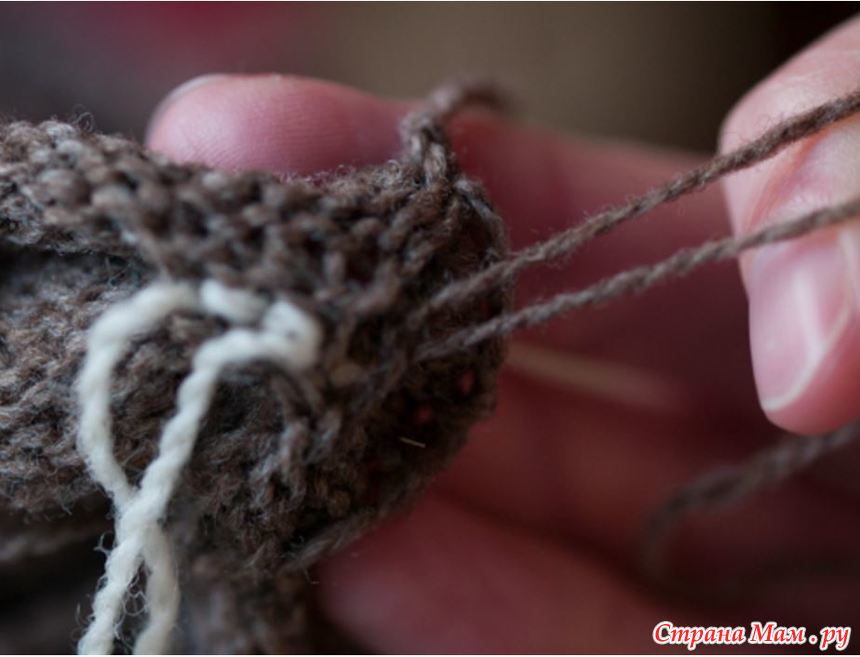
You’re ready for the hard part. You break the working yarn, leaving a 6 " tail to do the graft. Now look at the wrong side of the band. With a small double-pointed needle, you pick up the four purl bumps through which the waste yarn travels above where the hole will be. Here’s how those bumps will look once they’re on your dpn (the pinky-purple needle my thumb is holding in place):
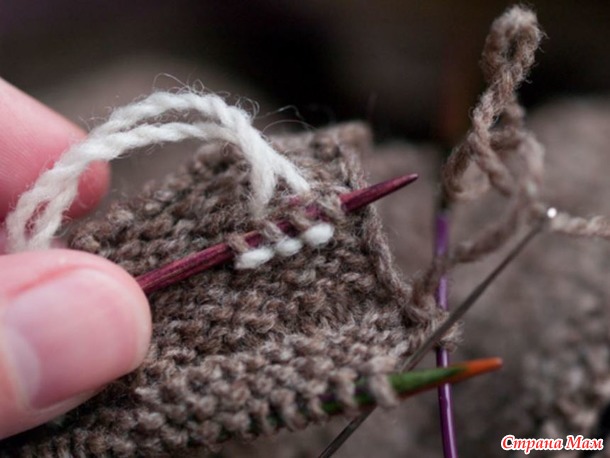
Note that you’re picking up four bumps even though only three stitches are being grafted for the buttonhole. That’s important, because you’ve got to unite the grafted stitches to their ungrafted neighbors on either side of the buttonhole. Otherwise you’ll end up with holes that aren’t buttonholes and aren’t at all perfect. Cluttering up this picture are the purple cord of my working circular needle—I’ve pulled the unused end of the needle through to let the live stitches before the buttonhole hang out somewhere secure so I don’t have to worry about dropping them while I’m busy with the grafting—and the silver darning needle, which I’ve already threaded with the 6" tail. Now bring the dpn (purple) and the working needle (striped) together and begin to graft. Take the threaded darning needle and bring it back to front (purlwise) through the first stitch on your working needle, like this:
(I switched darning needles on you. Sorry about that. The smaller eye of the silver one was giving me fits.)
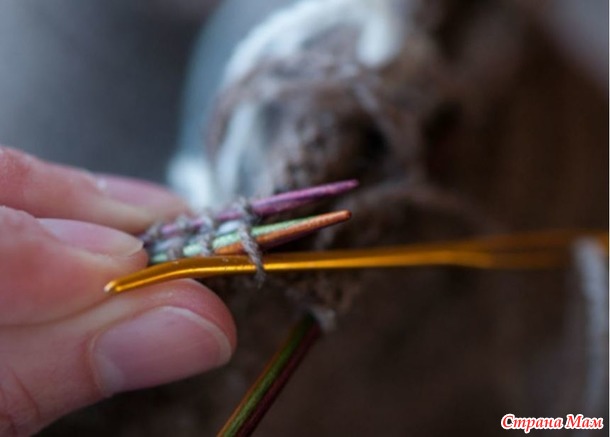
*Bring the darning needle back to front (purlwise) through the first purl bump on the dpn. Drop this bump off the dpn and thread the darning needle front to back (knitwise) through the second purl bump on the dpn. Leave this bump on. Now take the darning needle knitwise through the first stitch on the working needle and drop that stitch off. Go purlwise through the next stitch on the working needle and leave it on. Repeat from *, continuing to graft until no bumps remain on the dpn. (If you need some video help to brush up on grafting, try knittinghelp.com.)
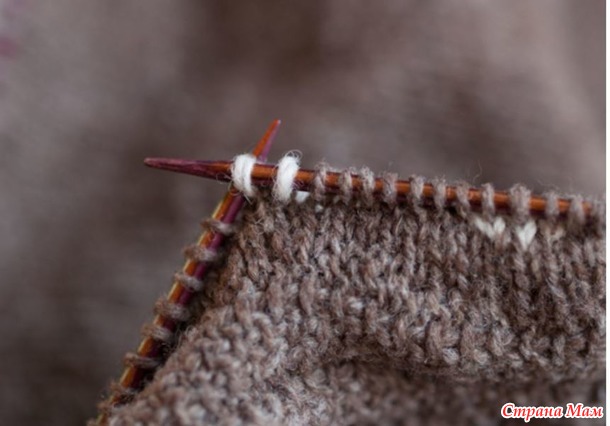
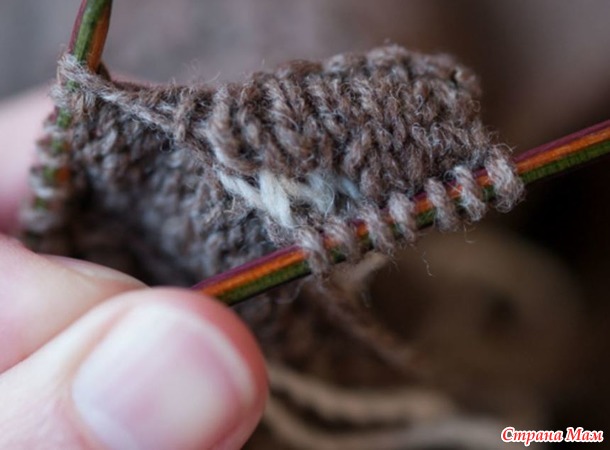
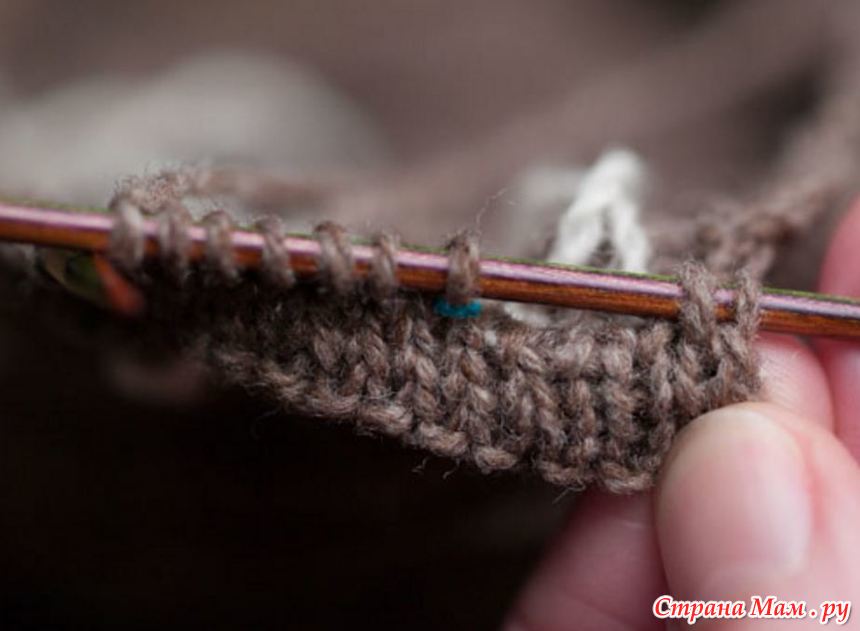
Abandon the cut tail of yarn and rejoin your ball of main yarn to knit to the next buttonhole. This is what your work should look like now:
Did it seem confusing that you were apparently grafting four stitches on the dpn to three on the main needle? If you click this photo bigger, you can see that I’ve highlighted at the base of the stitch to the left of the hole in turquoise. That’s to show where the grafting tail traveled through this stitch just before I dropped the last purl bump off the dpn: the three grafted stitches are thus linked to their ungrafted neighbors and there won’t be any funny business with gaps in the fabric. The stitch with the turquoise necklace is the first of the stitches that get knit on the way to the second buttonhole, though—don’t slip it or drop it off, okay? Here’s a nice row of future buttonholes from the right side:
… and from the wrong side:

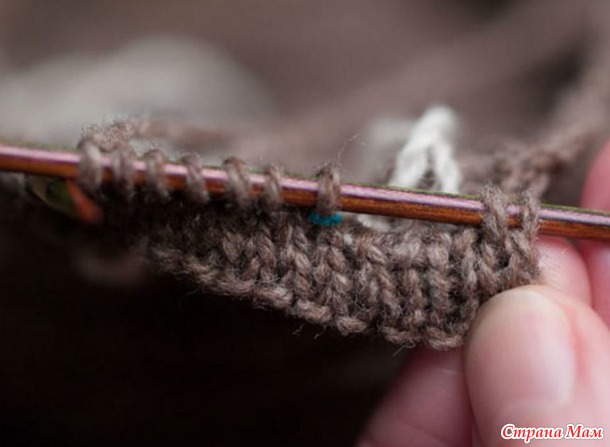
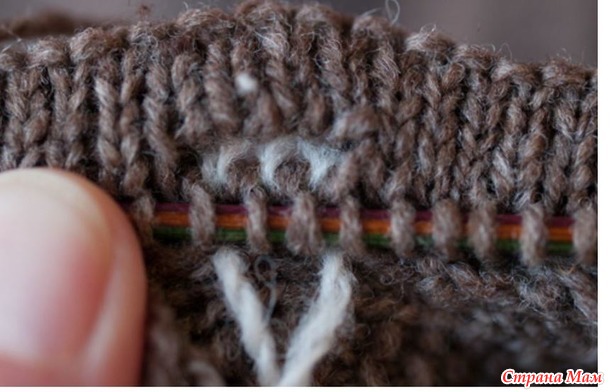
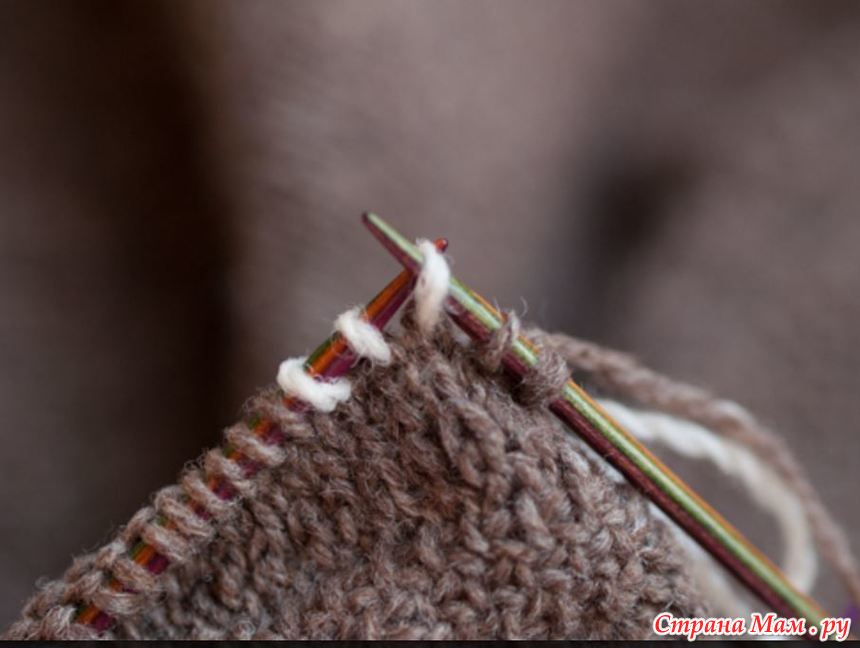
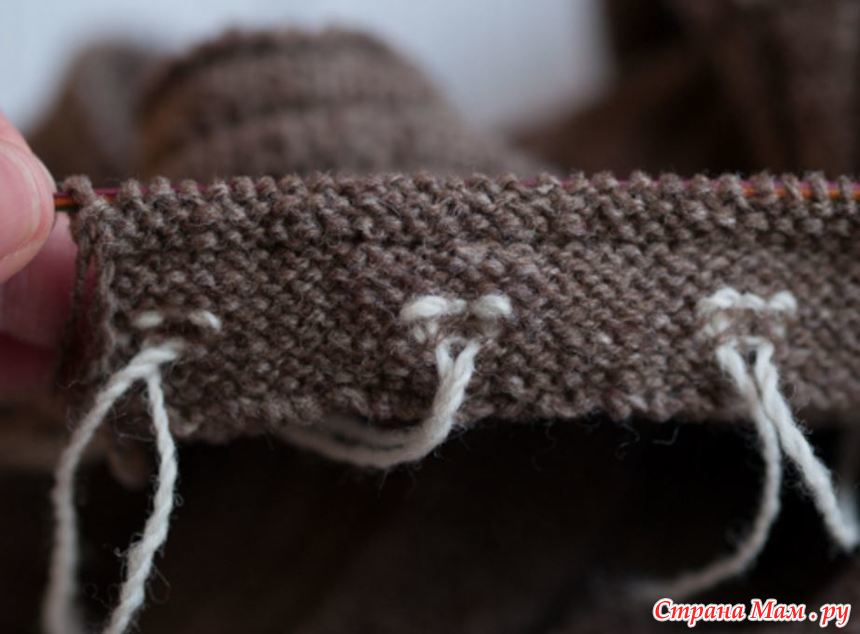
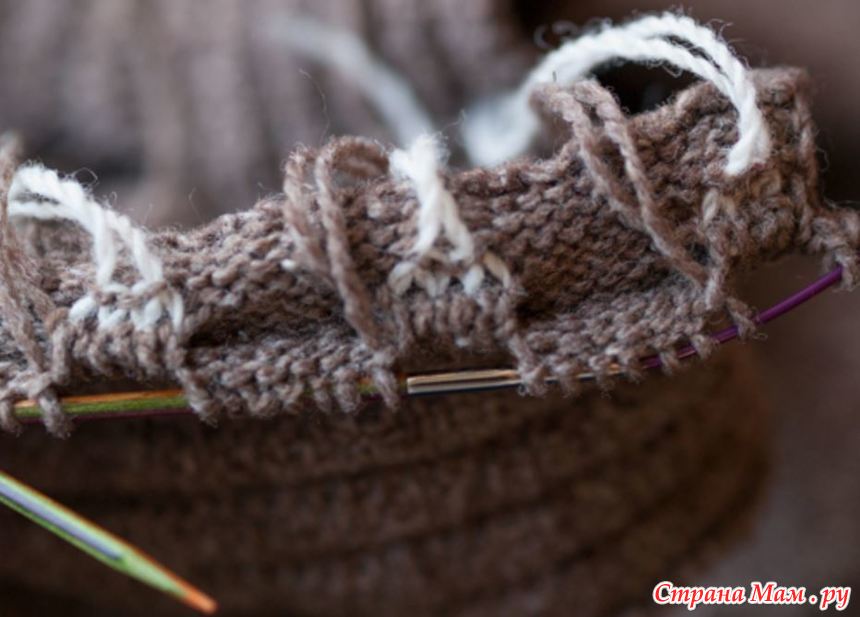
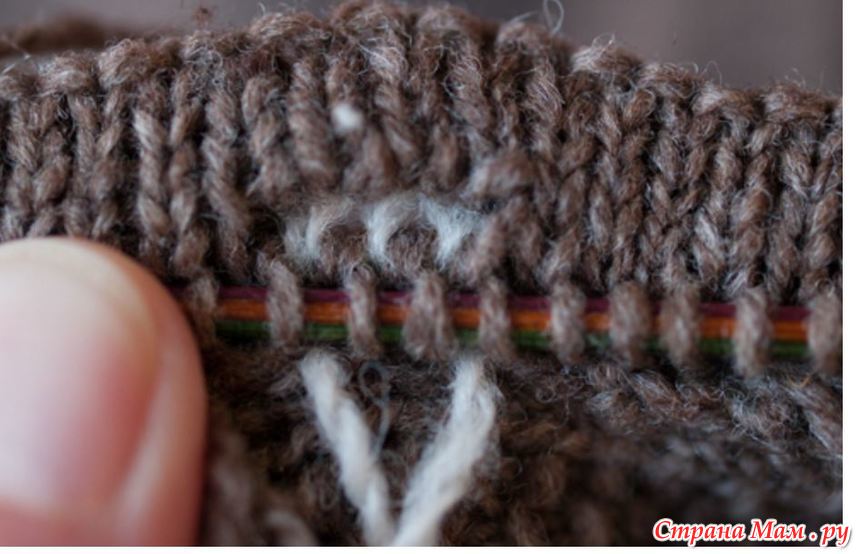
I know, that’s terrifying. All those ends! All that waste yarn mayhem! Don’t panic. Having knit and grafted and knit to the end of the row, we flip around to the wrong side. Purl to the first buttonhole. With your left needle, pick up the 3 purl bumps beneath the waste yarn:
… purl them:
… and continue in purl to the next buttonhole, where you’ll pick up the three bumps and purl them, and so on to the end of the row. Here’s how the facing looks now:
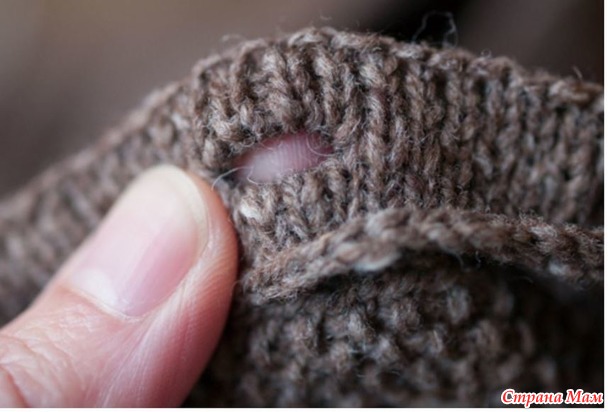
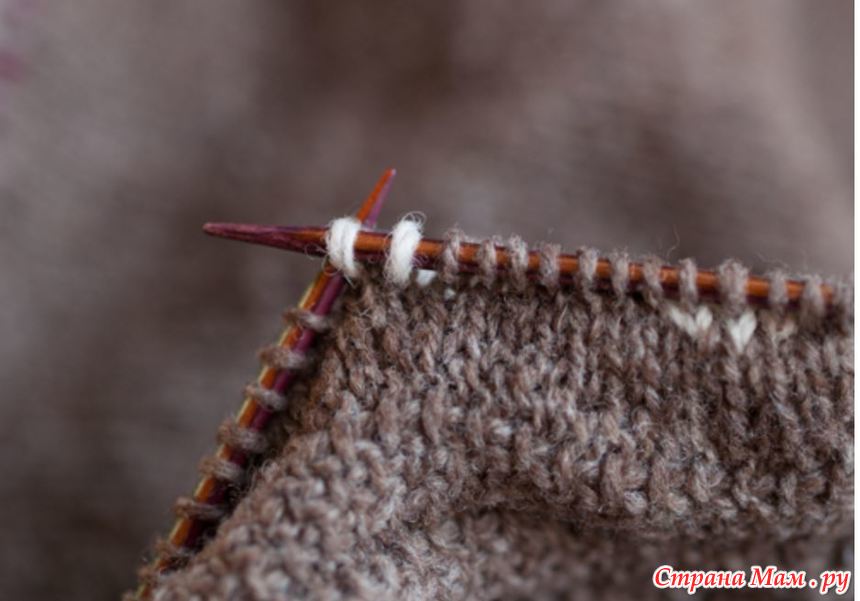
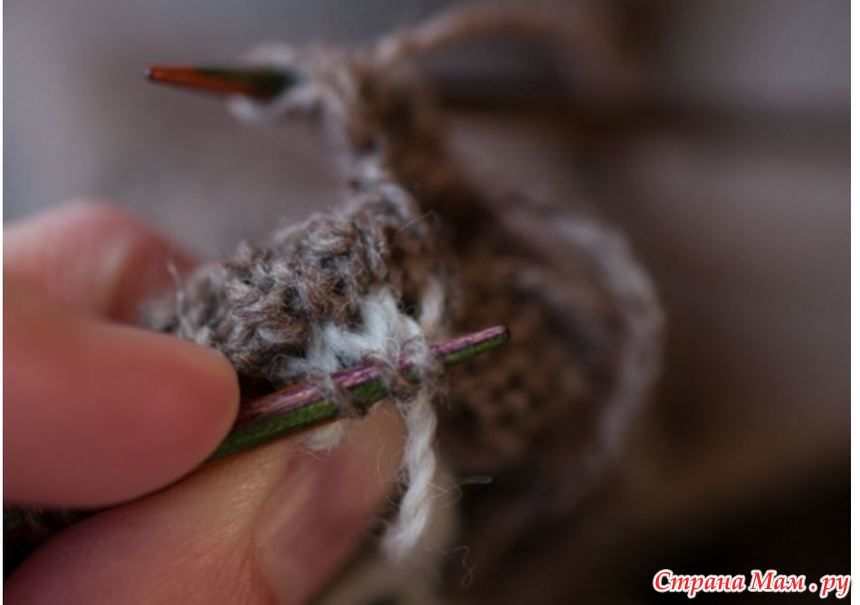
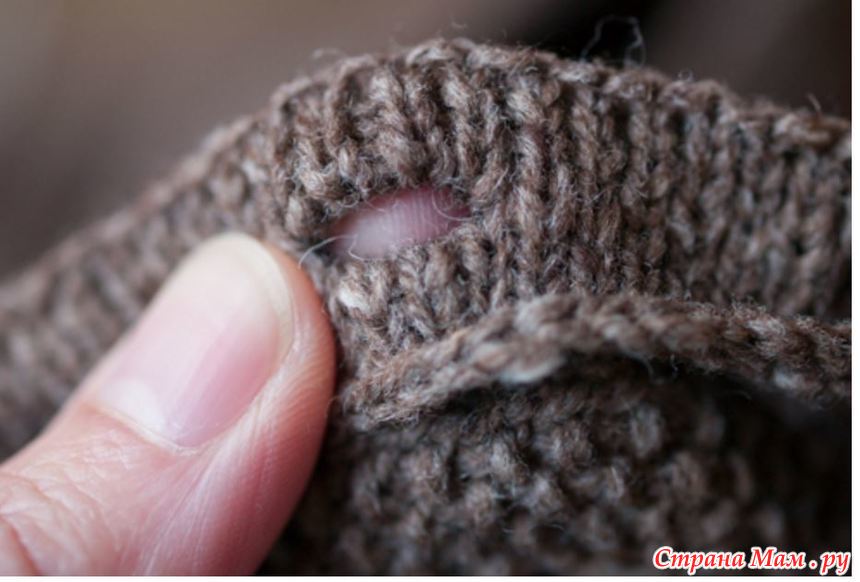
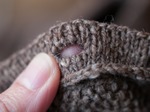
Work two more rows of stockinet—now the facing is the same height as the band—and bind off on the right side. Turn work to the wrong side. At the one edge of each buttonhole are two ends of the main yarn:
(Sorry I missed the mark a bit with the depth of field in that shot. But I think you can still see I’m holding the two ends in question coming from the right edge of the hole.) Gently snug them up so there are no loose stitches, tie them together in a square knot and cut them, leaving ends about 1” long. Pick out the scraps of waste yarn and admire the tidiest buttonholes that ever were. You may hear angels singing.
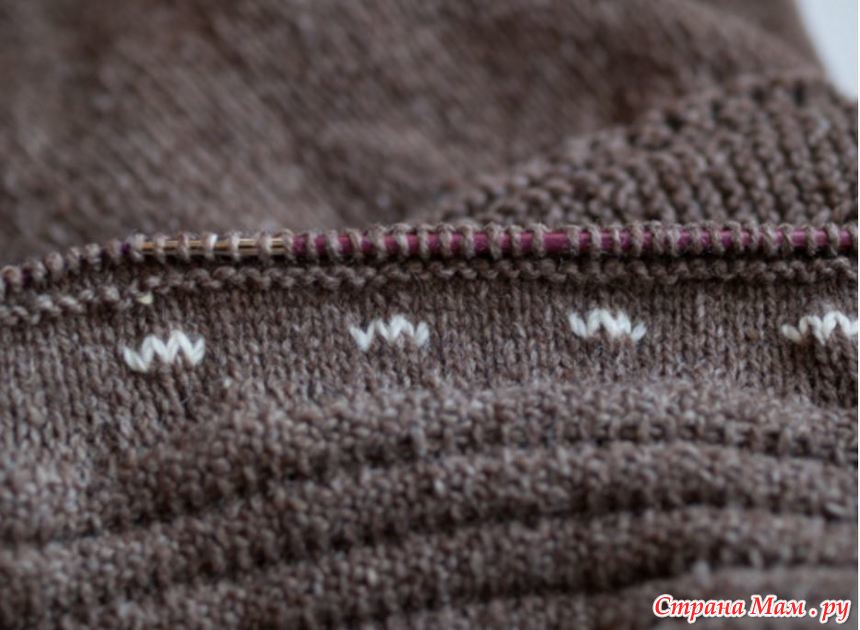
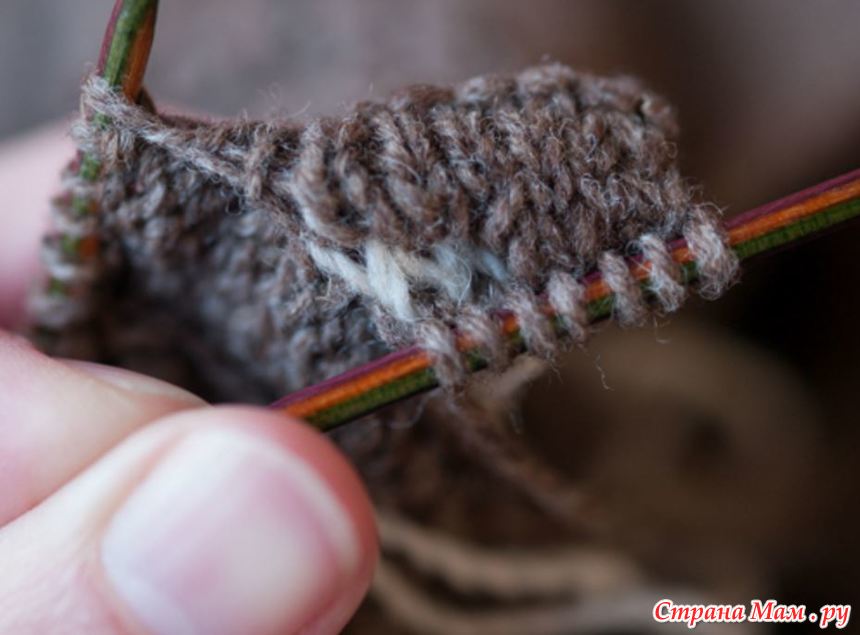
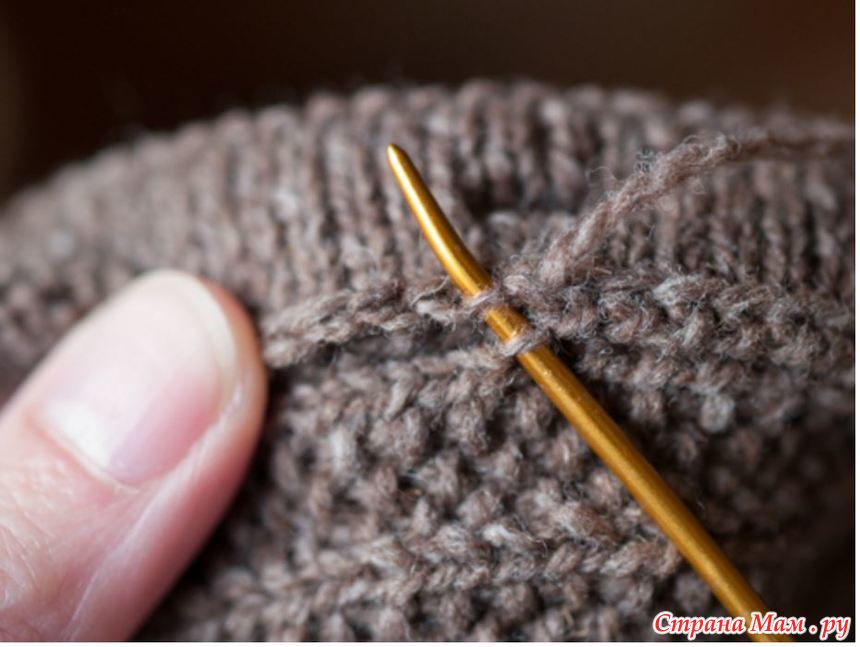
Then sew down the facing to the wrong side of the bodice, neatly sandwiching and concealing all those pesky knotted ends. There are a number of ways you can do the sewing, but I use a simple whipstitch through one leg of the bound-off stitch and one leg of a stitch from the bodice fabric:
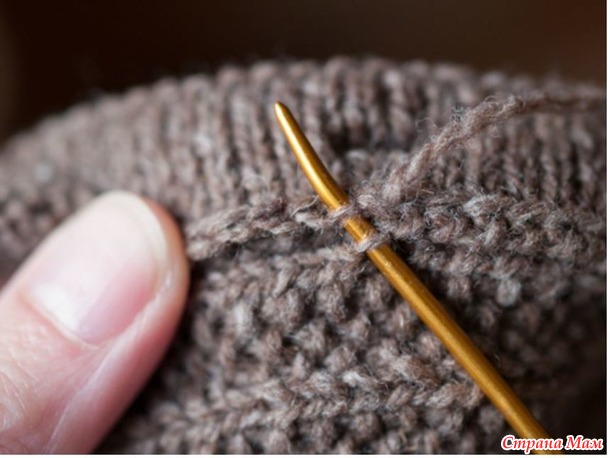
I picked the knit column because it’s easy to see that you’re always going into the same column and because it’s one stitch farther into the garment from the point where I picked up for the button band, which helps the band not to flip outward.
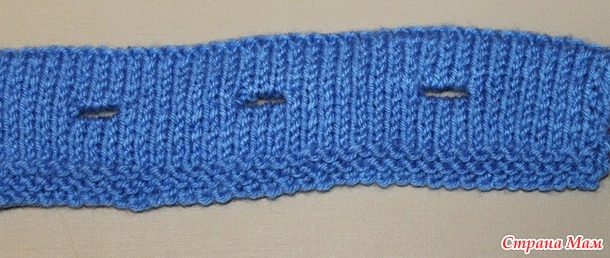
And that’s all, folks! Please contact me if you’re still confused about any part of this process. I hope you love your perfect buttonholes!
Всем спасибо за помощь!!!
сделала мк https://www.stranamam.ru/post/12737520/.
Очень понравились петли, но не получается их осилить.
Начиная с этого момента начинаются проблемы.
- Поделиться
Those waste yarn stitches get slipped back to the left needle. Here they go:
- Поделиться
Now you knit them again with the main yarn:
- Поделиться

… and continue on to the next buttonhole, and then the next.
- Поделиться
That’s all the fancy business for this row. Now you work three more stockinet rows, a turning row in reverse stockinet that will become the edge of the band, and three more rows of stockinet. Your work looks like this on the right side:
- Поделиться
… and like this on the wrong side:
- Поделиться
You’re ready for the hard part. You break the working yarn, leaving a 6 " tail to do the graft. Now look at the wrong side of the band. With a small double-pointed needle, you pick up the four purl bumps through which the waste yarn travels above where the hole will be. Here’s how those bumps will look once they’re on your dpn (the pinky-purple needle my thumb is holding in place):
- Поделиться
Note that you’re picking up four bumps even though only three stitches are being grafted for the buttonhole. That’s important, because you’ve got to unite the grafted stitches to their ungrafted neighbors on either side of the buttonhole. Otherwise you’ll end up with holes that aren’t buttonholes and aren’t at all perfect. Cluttering up this picture are the purple cord of my working circular needle—I’ve pulled the unused end of the needle through to let the live stitches before the buttonhole hang out somewhere secure so I don’t have to worry about dropping them while I’m busy with the grafting—and the silver darning needle, which I’ve already threaded with the 6" tail. Now bring the dpn (purple) and the working needle (striped) together and begin to graft. Take the threaded darning needle and bring it back to front (purlwise) through the first stitch on your working needle, like this:
- Поделиться
(I switched darning needles on you. Sorry about that. The smaller eye of the silver one was giving me fits.)
*Bring the darning needle back to front (purlwise) through the first purl bump on the dpn. Drop this bump off the dpn and thread the darning needle front to back (knitwise) through the second purl bump on the dpn. Leave this bump on. Now take the darning needle knitwise through the first stitch on the working needle and drop that stitch off. Go purlwise through the next stitch on the working needle and leave it on. Repeat from *, continuing to graft until no bumps remain on the dpn. (If you need some video help to brush up on grafting, try knittinghelp.com.)
Abandon the cut tail of yarn and rejoin your ball of main yarn to knit to the next buttonhole. This is what your work should look like now:
- Поделиться
Did it seem confusing that you were apparently grafting four stitches on the dpn to three on the main needle? If you click this photo bigger, you can see that I’ve highlighted at the base of the stitch to the left of the hole in turquoise. That’s to show where the grafting tail traveled through this stitch just before I dropped the last purl bump off the dpn: the three grafted stitches are thus linked to their ungrafted neighbors and there won’t be any funny business with gaps in the fabric. The stitch with the turquoise necklace is the first of the stitches that get knit on the way to the second buttonhole, though—don’t slip it or drop it off, okay? Here’s a nice row of future buttonholes from the right side:
- Поделиться
… and from the wrong side:
- Поделиться
I know, that’s terrifying. All those ends! All that waste yarn mayhem! Don’t panic. Having knit and grafted and knit to the end of the row, we flip around to the wrong side. Purl to the first buttonhole. With your left needle, pick up the 3 purl bumps beneath the waste yarn:
- Поделиться
… purl them:
- Поделиться
… and continue in purl to the next buttonhole, where you’ll pick up the three bumps and purl them, and so on to the end of the row. Here’s how the facing looks now:
- Поделиться
Work two more rows of stockinet—now the facing is the same height as the band—and bind off on the right side. Turn work to the wrong side. At the one edge of each buttonhole are two ends of the main yarn:
- Поделиться
(Sorry I missed the mark a bit with the depth of field in that shot. But I think you can still see I’m holding the two ends in question coming from the right edge of the hole.) Gently snug them up so there are no loose stitches, tie them together in a square knot and cut them, leaving ends about 1” long. Pick out the scraps of waste yarn and admire the tidiest buttonholes that ever were. You may hear angels singing.
- Поделиться
Then sew down the facing to the wrong side of the bodice, neatly sandwiching and concealing all those pesky knotted ends. There are a number of ways you can do the sewing, but I use a simple whipstitch through one leg of the bound-off stitch and one leg of a stitch from the bodice fabric:
- Поделиться
I picked the knit column because it’s easy to see that you’re always going into the same column and because it’s one stitch farther into the garment from the point where I picked up for the button band, which helps the band not to flip outward.
And that’s all, folks! Please contact me if you’re still confused about any part of this process. I hope you love your perfect buttonholes!
Всем спасибо за помощь!!!
- Поделиться
сделала мк https://www.stranamam.ru/post/12737520/.
|
|
Получить код для блога/форума/сайта |
Коды для вставки:
Как это будет выглядеть?
Скопируйте код и вставьте в окошко создания записи на LiveInternet, предварительно включив там режим "Источник"
HTML-код:

|
|
| BB-код для форумов: |
Как это будет выглядеть?
Страна Мам → Очень аккуратные петли. Помогите с переводом.
Тэги: мк спицами
 |
Девочки! Очень прошу помочь с переводом. Очень понравились петли, но не получается их осилить. Начиная с этого момента начинаются проблемы. Those waste yarn stitches get slipped back to the left needle. Here they go: Now you knit them again with the main yarn: … and continue on to the next buttonhole, and then the next. That’s all the fancy business for this row. Читать полностью |
| +89 |
 Lanna_08
|
73 комментария |


Комментарии
Проблемы дальше .
Это не 6 хвостов, двойной штрих это значок дюйма., здесь я так поняла 6 дюймов (грубо 24 см) на каждую петлю, там шов петля в петлю, я пробовала. Но вот как се это вместе соединить основной нитью,
6 " штрих это обозначение дюйма - запись 6" обозначает 6 дюймов.
↑ Перейти к этому комментарию
6 " штрих это обозначение дюйма - запись 6" обозначает 6 дюймов.
↑ Перейти к этому комментарию
Я вообще не знала, что это так в инглише называется....
↑ Перейти к этому комментарию
↑ Перейти к этому комментарию
Источник: https://www.stranamam.ru/post/12733519/#com97571110
Я бы перевела так: Оборвите рабочую нить оставив 6 дюймовый хвост чтобы сделать трансплантант.
Источник: https://www.stranamam.ru/post/12733519/#com97571110
Я бы перевела так: Оборвите рабочую нить оставив 6 дюймовый хвост чтобы сделать трансплантант.
↑ Перейти к этому комментарию
Пишите , что будет получаться, может докопаемся до истины.
Есть там еще один коварный момент. На одной спице 3 петли, а на второй 4 , как петля в петлю разное количество сшивать?
В описании про этот сайт написано, там как раз видео про сшивание двух полотен на двух параллельных спицах.
↑ Перейти к этому комментарию
попробую объяснить свою проблему
Вот связала петли планки дошла до 1 петли с какой нитью я должна работать? отрезать хвостик от основной или взять отдельную нить , а рабочую пока оставить в стороне?
попробую объяснить свою проблему
Вот связала петли планки дошла до 1 петли с какой нитью я должна работать? отрезать хвостик от основной или взять отдельную нить , а рабочую пока оставить в стороне?
↑ Перейти к этому комментарию
Спасибо большое, на сегодня порция садомаза получена , завтра продолжу!
Там только надо смотреть, чтобы петелька, которая перед петлей находится, не растянулась пока петлю сшиваете, а то дырка получится в углу у петли.
Начинаем с первой спицы,( где 3 петли) , а заканчиваем?
↑ Перейти к этому комментарию
↑ Перейти к этому комментарию
Это меня и волнует это основная нить или просто кусочек нити?
Вы можете услышать пение ангелов...
Штучка классная, спасибо всем!
Опа! После отправления коммента больше нет автоперевода... И нет той фразы....
Там даже по английски так и написано... Видать тоже юмор...
↑ Перейти к этому комментарию
Вставка изображения
Можете загрузить в текст картинку со своего компьютера: